

How To Open A Maytag Dryer For Repair Performa

How To Take Apart A Maytag Dryer
Older Dependable Care way and old Atlantis mode....
- Most mutual Maytag Dryer - Dependable care
- Newer 50 - shaped door - Maytag Dryer
Basic electrical tests and information- How to use a ohm meter. How to use a volt meter.
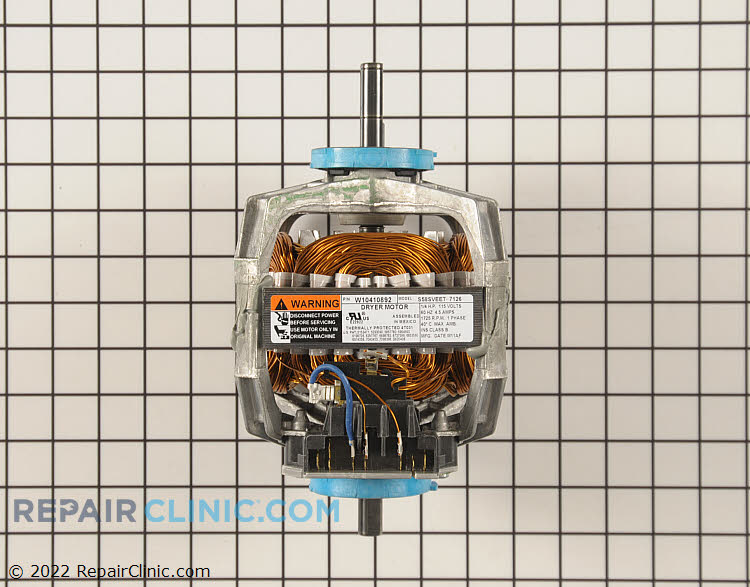
Motor commonly used on Maytag brand gas and electric clothes dryers #W10410999
Maytag dryers: - How to take autonomously - disconnect power starting time
Reading about the dryer basics and how to make electrical checks with a volt-ohm meter may be a good idea before starting specific repairs on any dryer.
We will start this page with disassembly of the dryer. Remove the two screws on the bottom lip of the forepart of the dryer. Pull out on the bottom of the front and the front end will disengage from clips on the elevation of the dryer holding the front in identify. Remove the wires from the door switch and set the front aside. From this point, y'all will exist able to check the pictured parts.
The parts you can check from here are the heater, operating thermostats, thermal fuses, door switch, and the loftier limit thermostat. This is a good bit of the repairs washed on this dryer. Now nosotros will remove the shroud and continue disassembly. The shroud is removed by taking the four screws holding information technology to the cabinet loose. Set the shroud bated and you tin now remove the encompass for the blower housing and supercede the blower. Remove the screws holding the blower housing cover, and information technology volition be quite evident how to supplant the blower wheel. The fan blower has modest keeper clips on the motor shaft that must be removed before the blower wheel can be replaced. Next stride is disassemble the belt from the idler pulley and remove the drum from the dryer. Early on models of this dryer had an access panel on the back where you could take the chugalug loose from the idler caster or reinstall the chugalug. On later models, this must be washed from in the dryer. I am going to show a picture from the rear of the dryer showing the belt thread on all Maytag dryers of this type. This is how the belt is threaded on both styles. This next picture shows the thread as you will see it within the dryer on the solid dorsum dryers. You have to pull the drum forward and thread the belt around the idler caster, then place the drum back on the rear rollers to reinstall. I removed the drum and then you can see the belt conspicuously. Notice that the apartment side of the belt goes to the pulsate and the grooved rides the motor caster. Past seeing both pictures, you lot should get a good thought of how the belt goes. I notice it easier to work in this area with the top of the dryer up. A couple screws volition get the elevation up. With the drum removed, the rear rollers and rear seal can be repaired. Yous can also repair the pulsate glides and front seal from this area. Yous can access the timer surface area a few different means depending on your model and the historic period of the dryer...this is one way (older style - remove two screws and lift up on the console dorsum cover)....and this is another way (newer style - remove two inner screws and pull the console front top forwards, it volition hinge and stay at that place).
Maytag Dryer - 50 shaped door - how to take apart:disconnect power first
Reading about the dryer nuts and how to make electrical checks with a volt-ohm meter may be a good thought before starting specific repairs on any dryer.
In the offset moving picture yous will see that in that location is 4 screws that must exist removed, one from each door hinge and the 2 across from the door on the other side. The door must be lifted up a little to remove the door and hinges. Gear up the door aside. Front colored panel is shaped like a football game goal mail service, grab concur of the thinner upper part and give a lilliputian twist on the exterior part to unclip the top section, pull the panel towards y'all and elevator off of the lesser clips. Set the front aside. Side by side is to remove the 2 screws and top clips, this will allow you to elevator the top upwards a little. The adjacent picture shows where the screws are to remove the bulk head, the height must be lifted a little to get the bulk caput off, don't forget the door switch wires. Afterward you lot have the bulk head off, the belt must be disconnected from the idler pulley and motor pulley so the drum can be removed. The elevation must be lifted a little to remove the drum, once the drum is removed you lot tin can become at annihilation you need inside the dryer chiffonier. This picture ( I must learn how to focus the photographic camera ) shows a thermal fuse, the operating thermostat, and in this instance a gas burner.
Dryer Repair Parts
![]()

How To Open A Maytag Dryer For Repair Performa,
Source: https://www.applianceaid.com/how-to-take-apart-maytag-dryer.php
Posted by: davisgredyet.blogspot.com
0 Response to "How To Open A Maytag Dryer For Repair Performa"
Post a Comment