

How To Repair A Bose Companion 5 Control Pod
Introduction
As they age, Bose Companion speakers outset making extremely loud crackles and pops when the book is adapted. The dissonance is created by the breakdown of lubricant in the command pod's potentiometer. This can exist fixed with a few sprays of electrical contact cleaner.
I've had my speakers for 17 years. I applied this fix for the beginning time after popping started at year 12. V years later, the popping started again. I took pictures this time.
-
-
With the control pod unplugged, flip over the base pod and peel off the grippy rubber pad.
-
If you're careful, at that place will be plenty gum left on the pad to stick if back on when reassembling. If not, you'll need to utilise double sided record.
-
A metal spudger may exist helpful hither.
-
-
-
Use a Torx T5 screwdriver to remove both screws that attach the touch surface to the base.
-
Remove the touch surface. It should just fall out.
-
Reassembly Tip: The light tube highlighted in blue goes into the affect surface aqueduct highlighted in orange. This directs the on/off status calorie-free on the command board to the surface of the pod.
-
-
-
The rubber volume dial is glued onto the potentiometer, which acts as the dial'south hub.
-
Slowly and carefully drill through the center of the dial. You lot only demand to drill down a few millimeters. Drill a couple of millimeters at a fourth dimension, stopping along the way to effort to jiggle the punch loose.
-
Selecting a drill bit: I recommend a one/four" drill scrap, only a bit with a slightly larger diameter will let you to be less precise most finding expressionless-center. However, if yous go too big, you lot'll turn the "D" shape of the band and potentiometer (second photograph) into an "O". This will make re-attachment hard.
-
-
-
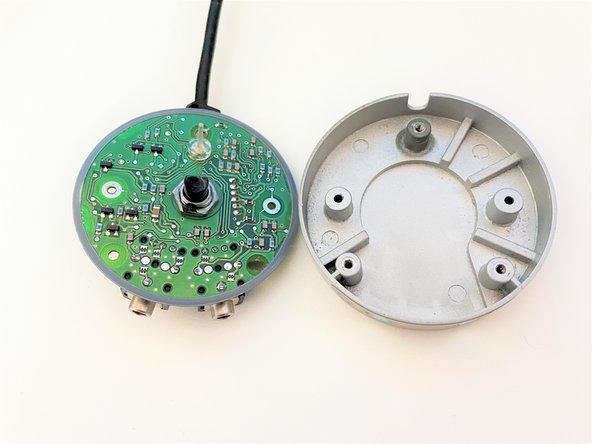
Use a #1 Phillips screwdriver to remove the iii screws attaching the control lath to the pod's base of operations.
-
Elevator the control board and wire out of the base of operations.
-
Elevator off the calorie-free tube and place it with your screws, otherwise information technology may go flying off in the next step.
-
Reassembly Tips: Make sure the lite belfry is back in place before reattaching the volume control knob. As well, ensure that the curved part of the wire's strain relief is facing the bottom of the puck.
-
-
-
Spray the top and lesser of the potentiometer with an electric contact cleaner. Employ a few brusk bursts on each side, then spin knob back and forth all the mode a few times. Spray both sides again, and then spin the knob over again. This will help spread the cleaner effectually and dissolve the gunk.
-
I used DeoxIT D5, only any cleaning and lubricating electrical contact cleaner will piece of work.
-
Where to spray: On the top (first photo), spray in between the plastic knob and the metal ring. On the bottom, spray the base and the sides. The cleaner volition work its way in through holes in the instance.
-
Cleanup and overspray: Don't worry if the cleaner gets all over the PCB. The propellant volition evaporate rapidly and the leftover oil helps protect the contacts. Remove pooled/excess cleaner by dabbing with a paper towel. Don't wipe -- you'll get lint everywhere. Compressed air can help blast off excess cleaner, but wear prophylactic spectacles!
-


Conclusion
To reassemble your pod, follow this guide in reverse order. DeoxIT lists a 2-minute dry time, so yous'll be able to employ your speakers by the time you finish with reassembly.
Embed this guide
Choose a size and re-create the code below to embed this guide as a small widget on your site / forum.
Preview

How To Repair A Bose Companion 5 Control Pod,
Source: https://www.ifixit.com/Guide/Fix+Pop-Crackle+When+Adjusting+Volume/142253
Posted by: davisgredyet.blogspot.com
0 Response to "How To Repair A Bose Companion 5 Control Pod"
Post a Comment